Is Blocking Worth the Effort?
The Importance of Blocking
Knitting or crocheting are rewarding and creative activities, but it's the finishing touches that give a finished piece its true dimension. Blocking is one of the most important finishing steps, as it gives the correct shape and size, and an incredible smoothness and evenness - without losing the three-dimensionality of the stitches.
There are many different ways to finish your knitting and crochet projects. Some people swear by steaming their projects, while others prefer to leave them as they are. Some people want a smooth and polished finish, while others want the handiwork to be visible in every way, including the gauge. There is no right answer, but since I am an avid blocker, I swear by blocking. I have often said in my classes that I would even block myself if it were possible, and if I didn't get even bigger and wider in the process, heheh. But now back to the subject at hand.
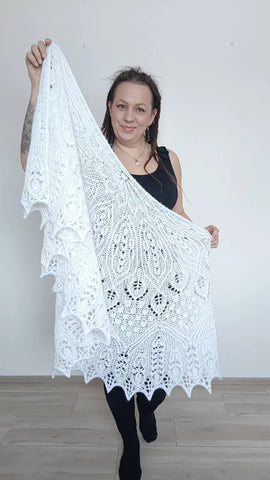
Blocking takes a little effort, but so does the knitting and crocheting itself. We do it because we enjoy it. Blocking is part of the process. You can learn to enjoy blocking. You can get hooked on it at the latest when you experience the joy and delight of removing a knitted piece from the blocking board. It is so virginally smooth, untouched, even, and shiny... You almost don't want to put it to use, but it's still a celebratory moment when you put on a scarf for the first time after blocking.
So, why block?
- Evens out gauge
- Straightens and evens out stitches
- Allows patterns and stitches to settle into their proper shapes without losing the three-dimensionality of the fabric
- Reduces twisting
- Drapes better
- Makes it easier to shape the finished piece to the correct dimensions
- Helps seams lie flat
- Gives a professional and polished finish:
Watch this video for a before and after blocking comparison: https://youtube.com/shorts/-2xls3d20Ao
Blocking supplies
- Stainless steel pins: Since the pins will come into contact with water, we don't want rust stains or dark oxidation marks on our new beautiful product.
- Base for blocking, e.g. modular exercise mats, stretching mats, camping mats, rug, sofa backing fabric, mattresses...
- Water, towels
- Optionally, inelastic and undyed yarn or blocking wires, measuring tape.
Important aspects of blocking
-
Before stretching: read the washing and care instructions for the yarn. For example, water temperature can be critical.
-
Soak the piece in water for about 20 minutes. Depending on the material, it may take a while for the fibers to soak through completely. This affects how well the fibers and the entire material will conform to the desired shape and how well the stretch will hold.
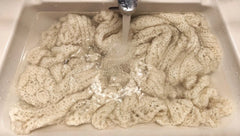
- Gently squeeze out the water and pre-dry the piece inside towels.
- Always use stainless pins.
- Allow the piece to dry completely while in blocking, preferably even longer. This also affects how well the result will hold. The effect of blocking will fade quickly if the piece is removed too early, like unnoticeable slightly damp. An impatient person can use a fan to help, but still allow ample drying time.
- The yarn ends can be waved off as the work progresses or before finishing, but there is a small risk that the threaded ends will tighten the work. Therefore, I recommend that the yarn ends are threaded and hidden only after blocking.
- Remember to be careful with children and pets, the pins are sharp and the work must be in place for at least 24 hours.
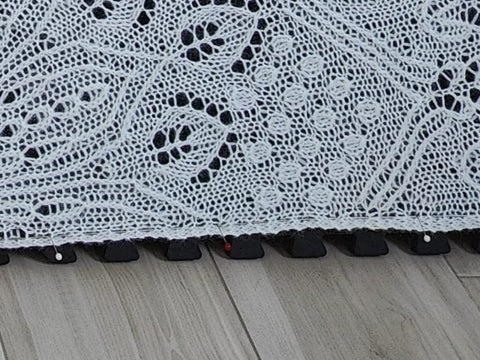
Blocking with pins
- Soak the piece in water for 20 minutes.
- Gently squeeze out the water and pre-dry the piece inside towels.
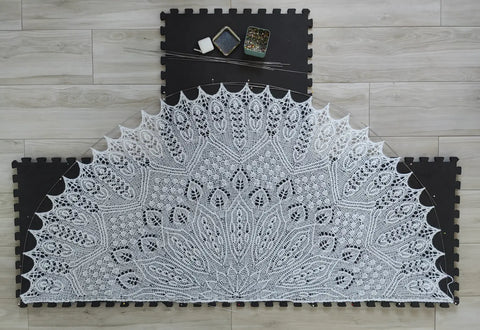
- Spread the piece out on a flat surface and measure it to the correct dimensions.
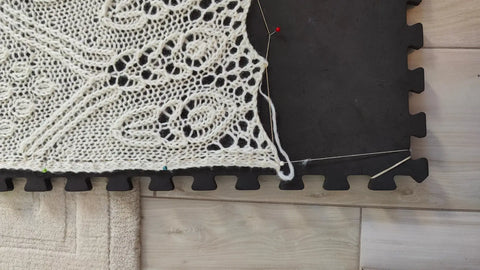
- Pin the piece down evenly, starting from the points of the shapes, e.g., the points of a triangular shawl. Then, add pins evenly between the existing pins, always adding a new pin in the center of the two existing pins (not starting from one side and working pin by pin only to find out that the pin spacing is not even).
- Do not place the pins right on the edge, as this can stretch individual threads or stitches. The best place for a straight edge, for example, is to place the pins a few stitches from the edge and close enough together so that there is no stretch mark at the pin.
- Check that the piece is evenly stretched throughout. If necessary, move all pins one at a time to be looser or tighter.
- Allow the piece to dry completely, preferably even longer than you think it is ready.
- Remove the piece and fasten the yarn ends.
Note: You will need a lot of pins and you need to be careful about their placement to get the lines straight.
Blocking with waste yarn or blocking cord
-
Thread the inelastic and undyed yarn along the edge of the piece.
- For example, a scarf often has at least one straight edge. You can thread the yarn a few stitches from the edge, even every other row.
- A blunt tapestry needle is best for threading.
- Allow plenty of yarn. Leave extra loops of yarn at the points of the piece - these are good for tightening the sides.
- For a sawtooth edge, you can thread the yarn from the points where the shape forms - not from every stitch.
-
Soak the piece in water for 20 minutes.
-
Gently squeeze out the water and pre-dry the piece inside towels.
-
Spread the piece out on a flat surface and measure it to the correct dimensions.
-
Pin the waste yarn or blocking cord down evenly across the entire piece. The yarn/cord can be loose at this stage. The pins should be placed on the blocking wires, not on the piece itself.
-
Tighten the blocking yarn from the corners. Wrap the excess yarn around the corners of an exercise mat or a few extra pins.
-
Check that the piece is evenly stretched throughout. If necessary, move all pins one at a time to be looser or tighter
-
Allow the piece to dry completely, preferably even longer than you think it is ready.
-
Remove the piece and fasten the yarn ends.
Note: You don't need as many pins, the waste yarn or blocking cord do some of the work. Straight lines are easier to draw than with individual pins. The blocking yarn can be easily and conveniently attached to the dry piece beforehand.
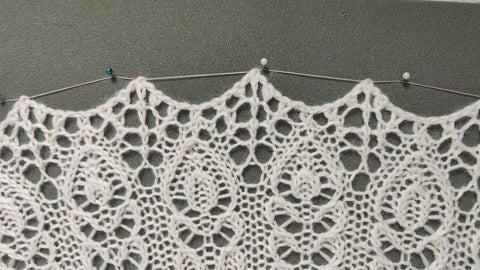
Blocking with blocking wires
-
Soak the piece in water for 20 minutes.
-
Gently squeeze out the water and pre-dry the piece inside towels.
-
Thread the blocking cords along the edge of the piece.
- For example, a scarf often has at least one straight edge. You can thread the cord a few stitches from the edge, even every other row
- For a sawtooth edge, you can thread the cord from the points where the shape forms.
- Blocking wires often come in straight and bendable forms; use the bendable ones when you want a line other than straight on the piece.
- If the length of the cords is not enough for the entire side of the piece, overlap two or more cords for a few stitches/rows.
- For example, a scarf often has at least one straight edge. You can thread the cord a few stitches from the edge, even every other row
- Spread the piece out on a flat surface and measure it to the correct dimensions.
- Pin the blocking cords down evenly, starting from the points of the piece and then adding pins between them.
- At the overlap point of the wires, you should also place pins outside the cord to prevent the end from sticking out and pulling the shape incorrectly.

- Check that the piece is evenly stretched throughout. If necessary, move all pins one at a time to be looser or tighter.
- Allow the piece to dry completely, preferably even longer than you think it is ready.
- Remove the piece and fasten the yarn ends.
Note: You don't need as many pins, the blocking wires do most of the work. Straight or curved lines are easier to draw than with individual pins. Attaching the blocking wires to the damp piece can be a bit uncomfortable.
Even though blocking might sound like a chore, give it a chance! Try it yourself! But beware, you really might get hooked!
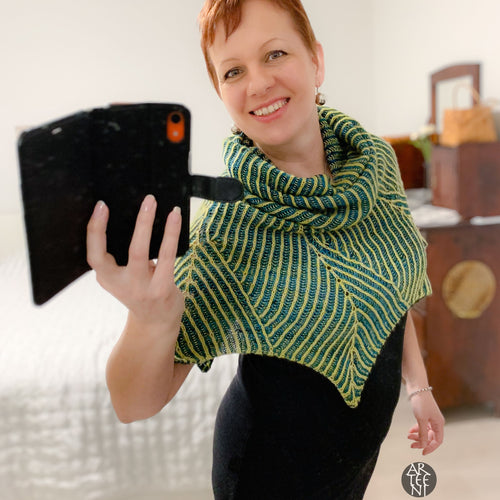
Do you like the shawl in the photos? You'll find Cotton Candy Princess Shawl instrcuctions here:
https://arteeni.fi/en/products/cotton-candy-princess
Best regards from a blocking enthusiast,
Sari
//Arteeni
Related Posts
-

Fix Jkl - Arteenin Ateljeella nonstop neuvontaa ja työpajaa!
-
Arteenin iltavuoro – rento käsityöilta Vaajakoskella
-
Kuulakka - A Knitted Poncho
Kuulakka - New Arteeni design - a fantastic everyday accessory!


